Sparring Knives
 These are instructions on how to make sparring knives in the style of
Aegis Consulting. They are designed to break
before bones and not poke too hard.
These are instructions on how to make sparring knives in the style of
Aegis Consulting. They are designed to break
before bones and not poke too hard.
Warning: These are not toys. They are for practicing with. While they are safer than a real knife, they are not going to prevent injury if you do something dumb! These minimize injury, not prevent it. They will leave bruises!
The Hardware
- Scissors.
 PVC cutters.
- Heavy wire cutters.
The Software
- Duct tape.
- 1/2 inch PVC pipe - schedule 40. It is important that it’s schedule 40. Schedule 40 will break before your bones will (usually).
- PVC pipe caps.
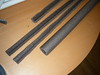 Pipe insulation. Dark gray foam tubes that you split to wrap pipes. Cut it
into quarters so that you have long thin strips.
Pipe insulation. Dark gray foam tubes that you split to wrap pipes. Cut it
into quarters so that you have long thin strips. 6 gage copper grounding wire. (Note: I’ve been told that untwisted cat-5
cable works better.)
6 gage copper grounding wire. (Note: I’ve been told that untwisted cat-5
cable works better.)- PVC glue.
- Sport tape.
Overview
 This is a cross view of the knife, showing how the insulation is layered.
Notice how the gaps in the tip are not overlapping so that the PVC won’t ever
slip through the insulation.
This is a cross view of the knife, showing how the insulation is layered.
Notice how the gaps in the tip are not overlapping so that the PVC won’t ever
slip through the insulation.
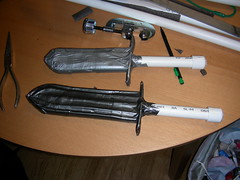
The Instructions
The basic idea is to loosely tape strips of insulation left and right of the pipe so that you end up with a flat blade. The insulation must be loosely taped. The goal is so that it is springy. When you tape, it should not deform the insulation. Use all the tape you need. The tape keeps it all together. You’re going to cover the whole thing at the end, anyway.
- Measure out PVC pipe. A good length seems to 8 to 10 inches. You need a handle that is comfortable with a cap on, a little space for the guard.
- Mark where the blade should go to with a pencil. This isn’t really needed, but it helps to make sure everything is where you want it.
- Put tape over the “tip” of the knife. The tip will be built from here.
- Cut out a thick triangle of foam insulation and tape it loosely onto the tip.
- Build up the “blade”
- Lay a strip of insulation starting from the bottom along the side and over the tip.
- Tape it in place, loosely. You don’t want to deform the insulation.
- Cut off the top at the tip.
- Feel free to add some more duct tape to hold it in place
- Repeat this process so that you have two insulation strips on each side. You want to alternate sides and cut off the tip so that it overlaps the previous piece. IMPORTANT: You do not want the gaps in the foam to overlay another gap. (see the diagram below)
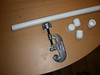
- Shape the copper (or untwisted cat-5) into a cross-guard. It will essentially be a large oval shape or rounded rectangle.
- Tape the cross-guard into place.
- Wrap the whole sucker up in tape! You’ll need several layers. You don’t want insulation or wires sticking out.
- Glue or friction fit the cap as the pommel.
- Fight!
Conclusion
Remember that these are not toys. Be safe when you use them. They are designed so that you can practice stabbing someone while only leave a bruise mark (normally).
I hope that was useful. If you have comments, criticisms, or questions, just ask!
Ciao!